
やってみた
2020.07.28
2時間でアプリ作ってみた
こんにちは、和田一志です。
コロナウイルス感染者数が増加し、3密を避けようという取り組みが各所で行われています。

(出典)
飲食店やカラオケなどでも3密を避ける働きが行われており、私もアプリで3密対策したいと思いました。
今回の狙いは3密の1つの要素「近距離での会話、発声」を避けるために、近距離での言葉を使う遊びに重点を置きました。
その結果、21ゲームがストアに無かったので今回作成することにしました。
21ゲームとは
◆1から21の数字を順番に言い合う
◆一度に言える数は、連続した3つまで
◆21を言ったら負け
例:12→345→6→78→9….19→20→21
<出典>
プロジェクト作成
環境
AndroidStudio version3.6.3
Kotlin
MacBook Pro
検証端末
AQUOS sence3

まず、MyApplicationという名前でアプリを作成します。テンプレートはEmptyActivityを使用します。
作成出来たら一回ビルドして正常に起動するか確かめましょう。ビルド出来ない等のバグが発生する場合があるので確認は忘れずにしておきましょう。
ビルド出来る事が確認出来たらactivity_main.xmlとMyActivity.ktを開きます。
今回はこの2つのファイルだけ編集していきます。

activity.xml
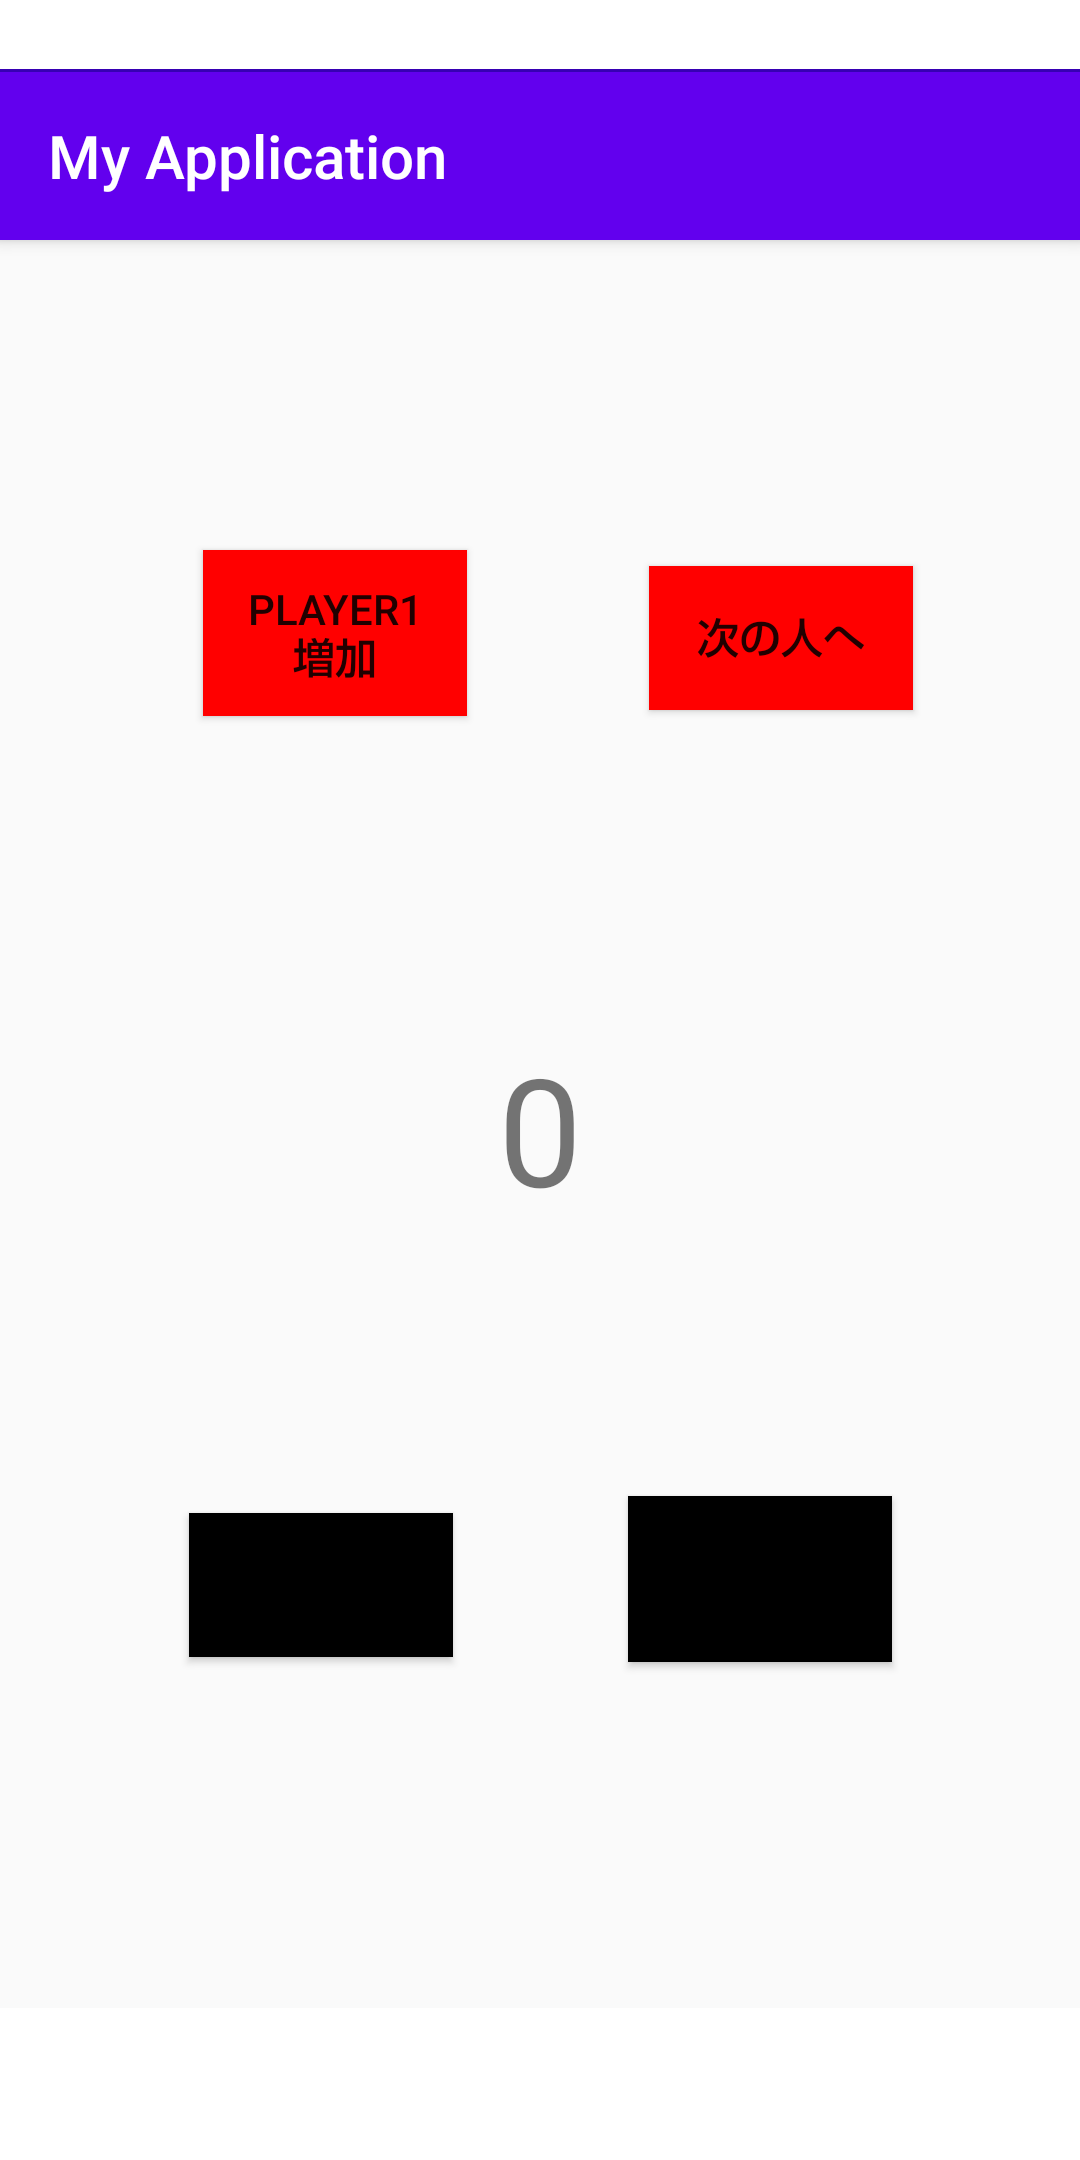
今回はレイアウトに拘らないので、必要なボタンとテキストの最低限だけ作成していきます。

こんな感じにレイアウトを設定しました。
<?xml version="1.0" encoding="utf-8"?>
<androidx.constraintlayout.widget.ConstraintLayout
    xmlns:android="http://schemas.android.com/apk/res/android"
    xmlns:app="http://schemas.android.com/apk/res-auto"
    xmlns:tools="http://schemas.android.com/tools"
    android:layout_width="match_parent"
    android:layout_height="match_parent"
    tools:context=".MainActivity">

    <TextView
        android:id="@+id/number"
        android:layout_width="0dp"
        android:layout_height="wrap_content"
        android:text="0"
        android:textSize="50dp"
        app:layout_constraintBottom_toBottomOf="parent"
        app:layout_constraintLeft_toLeftOf="parent"
        app:layout_constraintRight_toRightOf="parent"
        app:layout_constraintTop_toTopOf="parent"
        android:gravity="center"/>

    <Button
        android:id="@+id/player1"
        android:layout_width="wrap_content"
        android:layout_height="wrap_content"
        android:text="player1\n増加"

        app:layout_constraintBottom_toTopOf="@+id/next2"
        app:layout_constraintEnd_toEndOf="@+id/number"
        app:layout_constraintHorizontal_bias="0.249"
        app:layout_constraintStart_toStartOf="parent"
        app:layout_constraintTop_toTopOf="parent"
        app:layout_constraintVertical_bias="0.28" />

    <Button
        android:id="@+id/next1"
        android:layout_width="wrap_content"
        android:layout_height="wrap_content"
        android:text="次の人へ"
        app:layout_constraintBottom_toBottomOf="parent"
        app:layout_constraintEnd_toEndOf="parent"
        app:layout_constraintHorizontal_bias="0.52"
        app:layout_constraintStart_toEndOf="@+id/player1"
        app:layout_constraintTop_toTopOf="parent"
        app:layout_constraintVertical_bias="0.19999999" />

    <Button
        android:id="@+id/player2"
        android:layout_width="wrap_content"
        android:layout_height="wrap_content"
        android:text="player2\n増加"
        app:layout_constraintBottom_toBottomOf="parent"
        app:layout_constraintEnd_toEndOf="parent"
        app:layout_constraintHorizontal_bias="0.77"
        app:layout_constraintStart_toStartOf="parent"
        app:layout_constraintTop_toTopOf="parent"
        app:layout_constraintVertical_bias="0.78" />

    <Button
        android:id="@+id/next2"
        android:layout_width="wrap_content"
        android:layout_height="wrap_content"
        android:text="次の人へ"
        app:layout_constraintBottom_toBottomOf="parent"
        app:layout_constraintEnd_toStartOf="@+id/player2"
        app:layout_constraintHorizontal_bias="0.52"
        app:layout_constraintStart_toStartOf="parent"
        app:layout_constraintTop_toTopOf="parent"
        app:layout_constraintVertical_bias="0.78" />

</androidx.constraintlayout.widget.ConstraintLayout>
MainActivity.kt
レイアウト作成完了してからコードを書いていきます。
今回は処理速度やメモリ使用率、コードの綺麗さを気にしないで作成するので、全部onCreate内で作成していきます。
val number : TextView = this.findViewById(R.id.number)//中央の数字
val player1 : Button = this.findViewById(R.id.player1)//Player1の数字を増加させるボタン
val next1 : Button = this.findViewById(R.id.next1)//Player1が次の人にパスする時のボタン
val player2 : Button = this.findViewById(R.id.player2) //Player2の数字を増加させるボタン
val next2 : Button = this.findViewById(R.id.next2)//Player2が次の人にパスする時のボタン
var i = 0//1ターンの間に増加させた数値のカウント用変数
var next = false//1増加させないとパス出来ないので判定用変数
まず変数の宣言です。リソースIDは変更することが無いので、定数にしています。
 //player1からスタートするのでplayer2のViewは非表示にする
 player2.isClickable = false
 next2.isClickable = false
 //操作可能な時は背景を赤、不可能な時は黒に
 //red,green,blue
 player1.setBackgroundColor(Color.rgb(255, 0, 0))
 next1.setBackgroundColor(Color.rgb(255, 0, 0))
 player2.setBackgroundColor(Color.rgb(0, 0, 0))
 next2.setBackgroundColor(Color.rgb(0, 0, 0))
Player1→Player2→Player1・・・の順番でやっていくのでそのための初期設定を行います。
player1.setOnClickListener{
            //現在の数値を取得
            //CharSequence!型→String→Intという流れで変換する
            var temp = number.text.toString().toInt()
            next = true
            if(temp==20) {
                //20の状態で増加ボタンを押したら21になるので、負け
                temp++
                number.text = "21になりました。player1の負けです。"
                player1.isClickable = false
                next1.isClickable = false
                player2.isClickable = false
                next2.isClickable = false
            }else if(i<2) {
                //増加した数が合計3未満の処理
                i++
                temp++
                number.text = temp.toString()
            }else{
                //増加した数が合計3になった時の処理
                temp++
                number.text = temp.toString()
                i=0
                player1.isClickable = false
                next1.isClickable = false
                player2.isClickable = true
                next2.isClickable = true
                player1.setBackgroundColor(Color.rgb(0, 0, 0))
                next1.setBackgroundColor(Color.rgb(0, 0, 0))
                player2.setBackgroundColor(Color.rgb(255, 0, 0))
                next2.setBackgroundColor(Color.rgb(255, 0, 0))
                next = false
            }
        }
        next1.setOnClickListener{
            if(next) {
                //1増加させたかの判定
                i = 0
                player1.isClickable = false
                next1.isClickable = false
                player2.isClickable = true
                next2.isClickable = true
                player1.setBackgroundColor(Color.rgb(0, 0, 0))
                next1.setBackgroundColor(Color.rgb(0, 0, 0))
                player2.setBackgroundColor(Color.rgb(255, 0, 0))
                next2.setBackgroundColor(Color.rgb(255, 0, 0))
                next = false
            }
        }

        //Player1とやっている事は同じ
        player2.setOnClickListener{
            var temp = number.text.toString().toInt()
            next = true
            if(temp==20) {
                temp++
                number.text = "21になりました。player2の負けです。"
                player1.isClickable = false
                next1.isClickable = false
                player2.isClickable = false
                next2.isClickable = false
            }else if(i<2) {
                i++
                temp++
                number.text = temp.toString()
            }else{
                temp++
                number.text = temp.toString()
                i=0
                player1.isClickable = true
                next1.isClickable = true
                player2.isClickable = false
                next2.isClickable = false
                player1.setBackgroundColor(Color.rgb(255, 0, 0))
                next1.setBackgroundColor(Color.rgb(255, 0, 0))
                player2.setBackgroundColor(Color.rgb(0, 0, 0))
                next2.setBackgroundColor(Color.rgb(0, 0, 0))
                next = false
            }

        }
        next2.setOnClickListener{
            if(next) {
                i = 0
                player1.isClickable = true
                next1.isClickable = true
                player2.isClickable = false
                next2.isClickable = false
                player1.setBackgroundColor(Color.rgb(255, 0, 0))
                next1.setBackgroundColor(Color.rgb(255, 0, 0))
                player2.setBackgroundColor(Color.rgb(0, 0, 0))
                next2.setBackgroundColor(Color.rgb(0, 0, 0))
                next = false
            }
各ボタンをクリックした際の処理を書けば完成です。
isClickableでボタンのアクティブ、非アクティブ状態をコントロールし、
setBackgroundColorでボタンが押せる状態の時は背景色を赤、押せない場合は背景色を黒にしています。
現在の仕様だと、1回プレイしたらアプリを再起動しなければ再プレイ出来ません。再プレイ出来るように実装してみて欲しいという思いも込めて今回は省いています。
まとめ
コロナウイルスの感染者数は増えており、油断出来ない状況が続いています。
その中で自分に何が出来るのか、少しでも感染者数を減らすお手伝いは出来ないかという考えで、喋らないで出来る21ゲームを作りました。
今回作った21ゲームでは少しだけですが、アプリを本格的に作成し、用いればコロナウイルス感染対策が測れる事は多いです。
コロナウイルス感染対策にアプリを作りたい!とお考えの方はお問い合わせください。ぜひ私たちと一緒にプロジェクトを進めましょう!