アプリ開発日誌
2016.06.24
【iOS】プレースホルダー付きのUITextViewを実装してみました

iOS開発担当の鶴本です。
最近まで開発していたアプリにユーザー情報を入力するためにTextViewを使用しましたが、TextFieldにある入力フォームにおなじみのプレースホルダーがTextViewにはありません。
ある程度文字数が多くなる入力フォームでは、TextFieldでは対応できないので、プレースホルダーが付いているTextViewが欲しくなる時があります。
ということでプレースホルダー付きのTextViewをSwiftで実装してみました。
ソースコード
import UIKit

@IBDesignable
class PlaceHolderTextView: UITextView {

    // プレースホルダーのラベル
    private var placeHolderLable: UILabel = UILabel()

    // MARK: - ストーリーボードからの呼び出し
     required init(coder aDecoder: NSCoder) {
        super.init(coder: aDecoder)!
        initialize()
    }

    // MARK: - コード上からの呼び出し
    init(frame: CGRect) {
        super.init(frame: frame, textContainer: nil)
        initialize()
    }

    // MARK: - 初期化メソッド
    func initialize() {
        NSNotificationCenter.defaultCenter().addObserver(self, selector: #selector(self.TextChanged(_:)),
            name: UITextViewTextDidChangeNotification,
            object: nil)

        self.textContainerInset = UIEdgeInsetsMake(5, 5, 5, 5)
        placeHolderLable = UILabel(frame: CGRect(x: 8, y: 5, width: self.bounds.size.width - 16, height: 0))
        placeHolderLable.font = UIFont.systemFontOfSize(14.0)
        placeHolderLable.lineBreakMode = NSLineBreakMode.ByCharWrapping
        self.addSubview(placeHolderLable)
    }

    // MARK: - プレースホルダーのテキスト設定
    @IBInspectable var placeHolder: String = "Place Holder" {
        didSet {
            self.placeHolderLable.text = placeHolder
            self.placeHolderLable.sizeToFit()
        }
    }

    // MARK: - プレースホルダーの色の設定
    @IBInspectable var placeHolderColor: UIColor = UIColor.lightGrayColor() {
        didSet {
            self.placeHolderLable.textColor = placeHolderColor
        }
    }

    // MARK: - プレースホルダーの枠線の色の設定
    @IBInspectable var borderColor: UIColor = UIColor.clearColor() {
        didSet {
            self.layer.borderColor = borderColor.CGColor
        }
    }

    // MARK: - プレースホルダーの枠線の色の設定
    @IBInspectable var borderWidth: CGFloat = 0 {
        didSet {
            self.layer.borderWidth = borderWidth
        }
    }

    // MARK: - プレースホルダーの角の丸みの設定
    @IBInspectable var cornerRadius: CGFloat = 0 {
        didSet {
            self.layer.cornerRadius = cornerRadius
            self.layer.masksToBounds = true
        }
    }

    // MARK: - プレースホルダーの枠線の色の設定テキストが変更された際に呼ばれる
    func TextChanged(notification: NSNotification) {
        placeHolderLable.hidden = (0 == text.characters.count) ? false : true
    }

    // MARK: - 通知の解放
    deinit {
        NSNotificationCenter.defaultCenter().removeObserver(self)
    }
}
使用例
クライアントコードでは例えば以下のように書きます。
    override func viewDidLoad() {

        super.viewDidLoad()

        // 初期化
        let placeHolderTextView = PlaceHolderTextView.init(frame: CGRect(x: 100, y: 100, width: 200, height: 200))

        // プレースホルダーに値を設定する
        placeHolderTextView.placeHolder = "プレースホルダー"
        placeHolderTextView.placeHolderColor = UIColor.grayColor()
        placeHolderTextView.borderColor = UIColor.blueColor()
        placeHolderTextView.borderWidth = 5
        placeHolderTextView.cornerRadius = 10

        // 画面に表示
        self.view.addSubview(placeHolderTextView)
    }
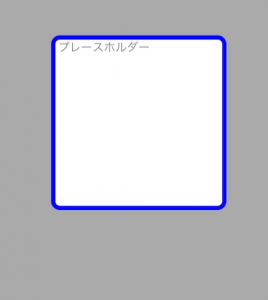
プレビュー
実行結果です。
まとめ
使用例ではコードで生成しましたが、ストーリーボードでも生成できます。その際ストーリーボード上でのプレースホルダーのレイアウトが少し崩れてしまうので、その点が課題として挙げられます。
機会があれば今後も自分が実装したものについて書いていきたいと思います。
それでは。